What is Asteroom?
Asteroom offers hardware and software that allows you to take 3D virtual tours using just a smartphone. We offer virtual tour software, which includes an online photo editor and an app. Plus, our easy-to-use Asteroom Pano Kit is a technology-forward alternative to 360° cameras.
How do we charge? How about renewal?
Why do I need to subscribe?
Asteroom charges for the use of our best-in-class technology which turns panorama photos into a 360° virtual tour. We also charge to host the tours on the Asteroom Cloud so your viewers can visit them. If a subscription is cancelled, the tours will no longer be viewable by visitors but they will remain in your account. However, the tours will be restored if you ever select to reactivate your account.
How does Asteroom charge?
Our pricing is simple and transparent. We have a pay as you go subscription plan meaning that you only pay for the service when you need it. Monthly fees for Asteroom are based on the number of tours that can be shared publicly, as well as the number of accounts that have registered logins.
How to renewal?
Users can choose to subscribe for one month, three months, six months, or one year at a time. After receiving a notification that your account has expired, please log onto www.asteroom.com to renew your account. We will soon be launching options to set up recurring payments.
What kind of smartphones and 360° camera does Asteroom support?
Supported smartphone models
We support all devices running Android 6 and iOS 11 or later. Smartphones that are an iPhone 6 or newer, Samsung Galaxy S7, SONY Xperia X Compact, or LG G5 / V20 are all supported device types. We also support the latest multi-lens smartphones such as iPhone 11 Pro series and Samsung Galaxy 10 series.
Supported 360° cameras
Asteroom have direct integrations with Theta series, including S, SC, V, and Z1, and Insta360 ONE X. You can also import 360° photos taken by other 360° cameras or 360° smartphones. Ratio of 360° photos length and width has to be 2:1.
How to redeem voucher?
Activation via the app
- Upon receiving the Asteroom Pano Kit please enter the activation code in the package in the app or web editor.
- Once the download of the app is complete, please register and log in.
- Click on the menu
 in the top-left corner of the app, select 【Version】, and enter your and enter your activation code into the field.
Activation via the website
- Go to www.asteroom.com
- Register and log in.
- Click on Setting
 in the top-right corner, select Resources/Version,and enter the activation code with our dashes in between.
How can I report issues to Asteroom via Feedback?
Your satisfaction is our biggest concern. If you experiences any technical difficulties-- such as freezing or being unable to connect with Bluetooth -- please report the problem to Asteroom, so that we can take the necessary actions to improve our service.
- Go to the step or the screen where the failure occurs.
- Exit the screen by clicking on the app menu iin the top-left corner.
- Select "Feedback" to open up your mobile phone's default email app and automatically fill the message with the error log. All you need to do is to click 'Send' and we will receive your feedback.
 Note:
Note:
The error has to occur before sending your feedback in order to generate an error log.
The user must enable access to the phone's mailbox to be able to use the above method for reporting errors.
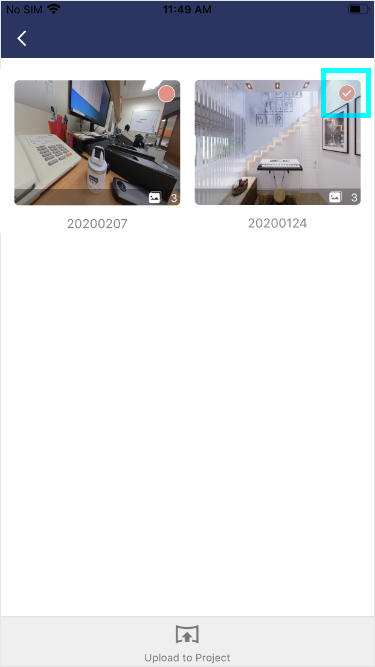
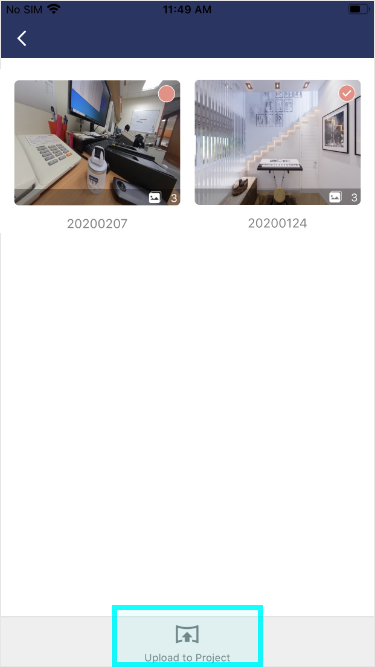
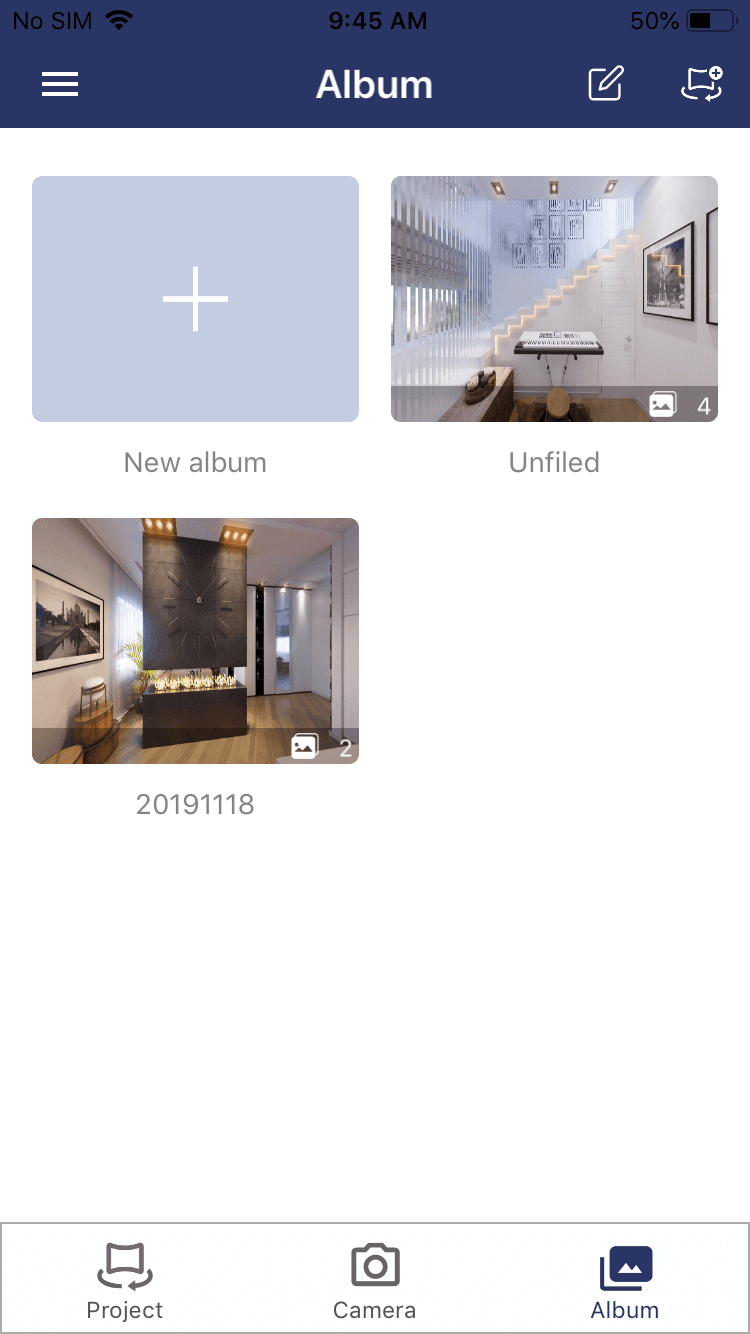
How can I shoot and create a tour?
- To shoot panoramas, click the
 camera icon in the app.
 - Check and name the album. All panoramas will be saved in the album named after the shooting date, formatted as YYYYMMDD. Click
 album to check the panoramas and rename the album.
 - Upload the album and create a new tour. Click
 on the album page, select an album you want to upload, and click
  to upload then a tour is created automatically.

What should I do if my 360° photos are blurry?
-
Double check that Pano Kit is set up on even ground and does not shake while turning. Check attachment of fisheye lens on the phone. The center of the fisheye lens should be placed exactly at the center of the rear lens of your phone. Please refer to our tutorial video on How to set up Asteroom Pano Kit.
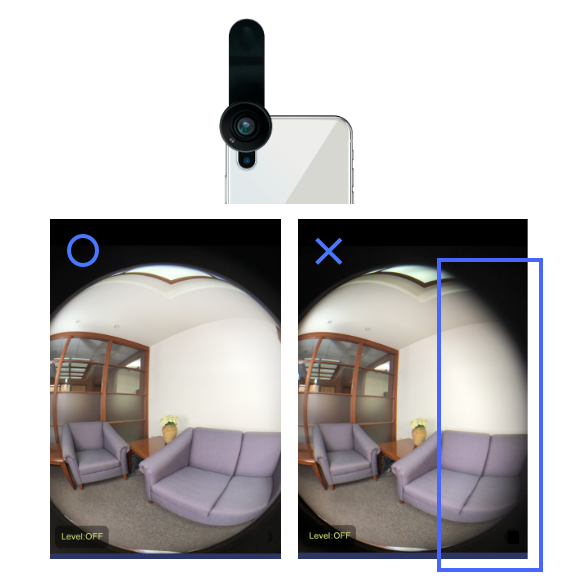
Check the detected range is clean and no covering. -
Keep fisheye lens align with the clip jaw as possible to prevent offsetting.
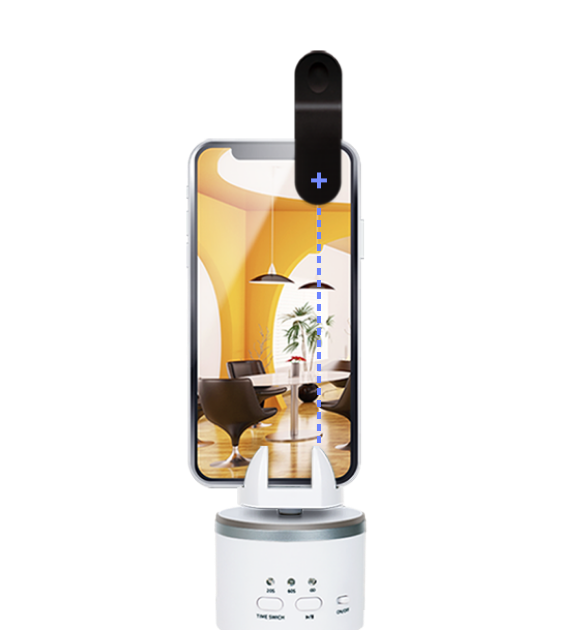
-
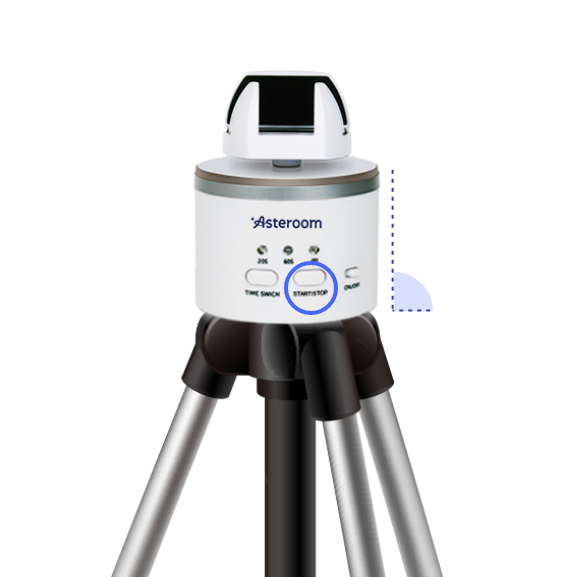
Don't lock too tight causing stuck nor too loose causing phone shaking. Test rotation with START/STOP before shooting. And it’s recommended to use a standard tripod.

-
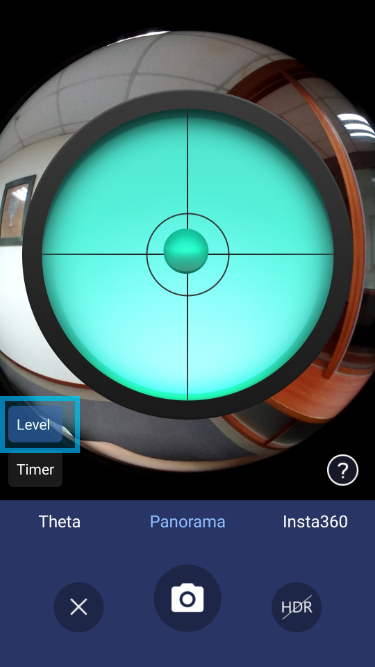
Use level within the app to check its stability.
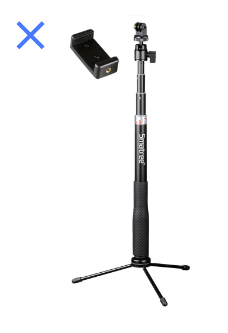
- If you are using a monopod, it is recommended to use the timer to allow the monopod to stabilize after you tab the camera although we always recommend using a steady tripod. When shooting again, take multiple shots at the same location and pick the best one.
-
Use special phone case for fisheye lens attachment. There are some phone models not easy to attach the lens at the right position without a phone case. We provide phone cases for iPhone Series and Samsung Galaxy series. https://www.asteroom.com/en/pricing

phone cases for fisheye lens attachment.
When to use timer?
- If you don't want to move along with the rotator, you may choose to set a timer and leave the room.
- Monopods are susceptible to shaking. It is recommended to use the timer to give it time to stabilize after tabbing ‘Camera’.
What should I do if the rotator stops rotating?
- The Pano Kid has run out of battery. Please charge it.
- The rotator was screwed too tightly on the tripod, causing some components of the rotator to get stuck and malfunction. Please loosen it to the extent that won't cause your phone shaking.
- There is an unknown reason that needs more troubleshooting. Please contact us for further assistance.
What should I do if the Bluetooth doesn’t work?
Troubleshoot this issue by restarting Bluetooth of the rotator and your phone. They will automatically re-pair and connect. The status of camera will be a bright light once connecting. If it keeps failing to connect, please report the issue via "Feedback" in the app.
What is the resolution of 360° photos taken by Asteroom?
The resolution of 360° panorama depends on your smartphone, but most range from 30 to 32 megapixel.
View all questions

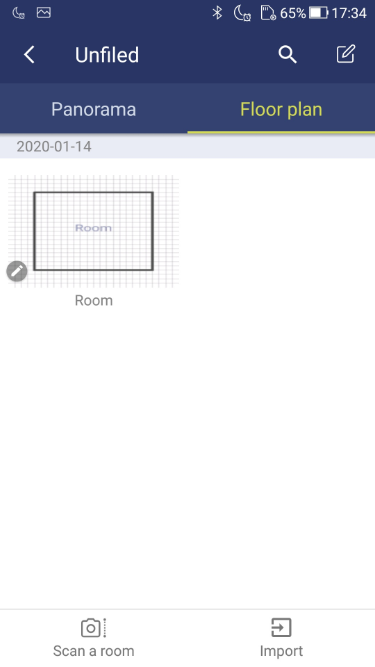
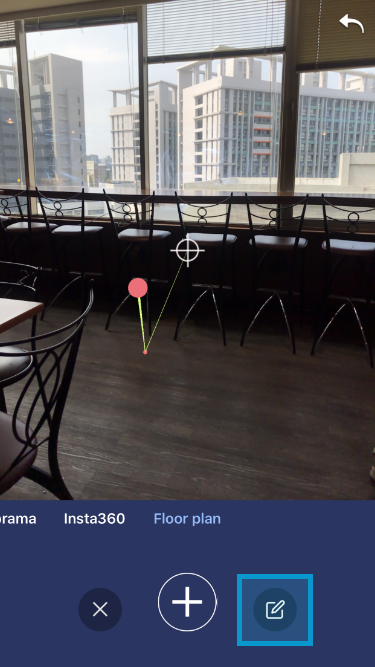
How can I make a Floor Plan from the app?
Using AR to measure room dimensions
- Please click here to confirm that your phone supports AR measurement.
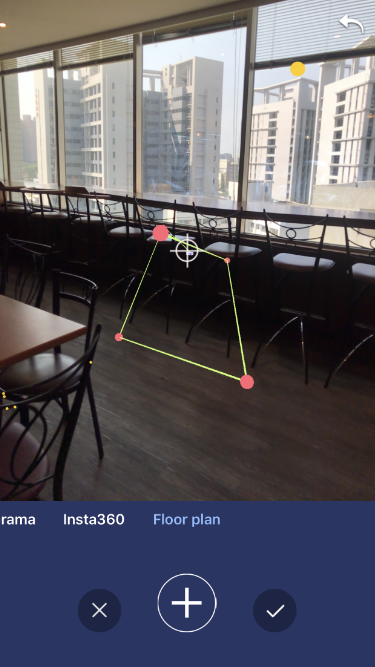
- Log in to the Asteroom app.Click on Camera and change the mode to Floor Plans.
- Point the phone lens at the ground and choose a wall corner as the origin. Move left and right. There is no need to attach the fisheye lens.
- When Aim
 appears on screen, click Add
  and you will see a red dotted stick at the aimed point. Repeat this step at every turning point in the room until you return to your original point, where you click on Done
  o save the measurements. The Undo
  in the top-right corner is used to undo the previous red dot.
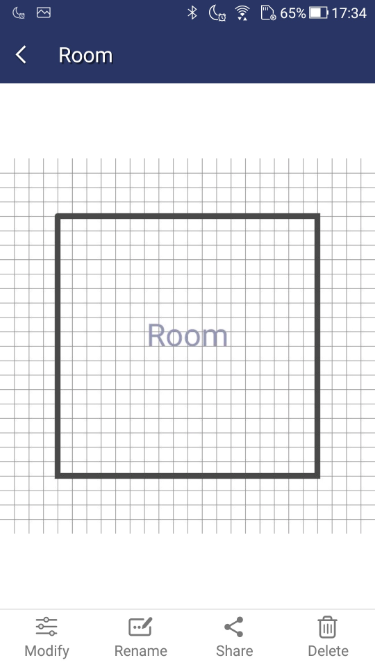
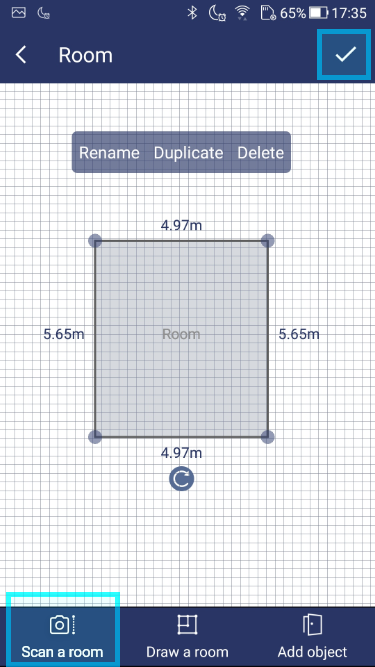
Adding another room to the same Floor Plan
- Go to Material > enter one of album > switch to Floor Plan tab > open the Floor Plan file you wish to edit.
- Click on Edit
 to the lower-left > click on Camera
  > Repeat steps 4 and 5 listed above.
 - Click on any shape to move, rename, duplicate or delete it.
- Click on Done in the top-right corner to save when you are done.
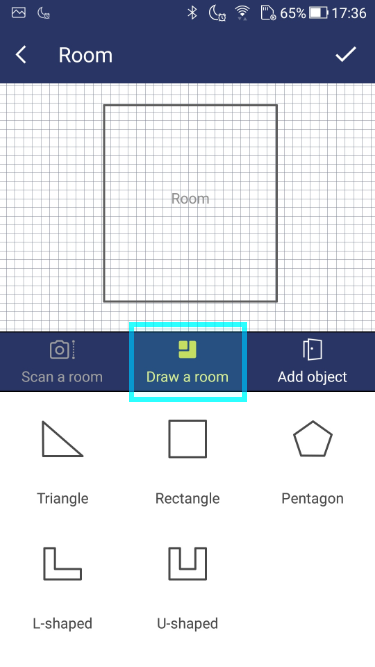
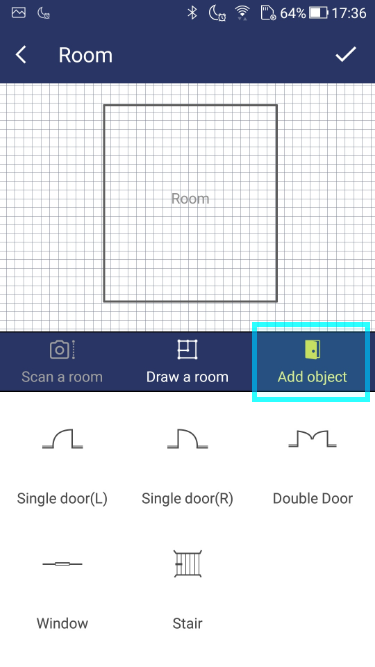
Drawing a Floor Plan using an in-house modeling group
- Click on Camera and change it to Floor Plan mode.
- Click on Drawing
 to the right to enter drawing mode. Opening up the functions menu, you will see Layout module
  , Door
  . Select an icon to add, and then to drag, rotate, rename, delete and copy.
 - When you are done, click on Done in the top-right corner to save.
How can I connect the panos by setting up "hotspots"?
Creating a Hotspot
- Open a tour, choose a panorama, click on the "Next Room"
 , and follow the screens to complete the three steps listed below.
 - Add a hotspot. It is recommended to name each panorama for the ease of identification and establish the flow between rooms.
- Set the hotspot location. The top screen is for room A to room B while the bottom screen is for the reverse.
- Preview the tour! . use the Preview
 to check the hot spots it work smoothly.
Edit Hotspot
- Click on the hotspot you wish to edit to enter hotspot editing mode. Pen
 and Trash
  will appear in the top-right corner.
 - The pen indicates that the hotspot is being edited, and the trash indicates that the hotspot is about to be deleted.
- Click elsewhere on the screen to turn off hotspot editing mode.
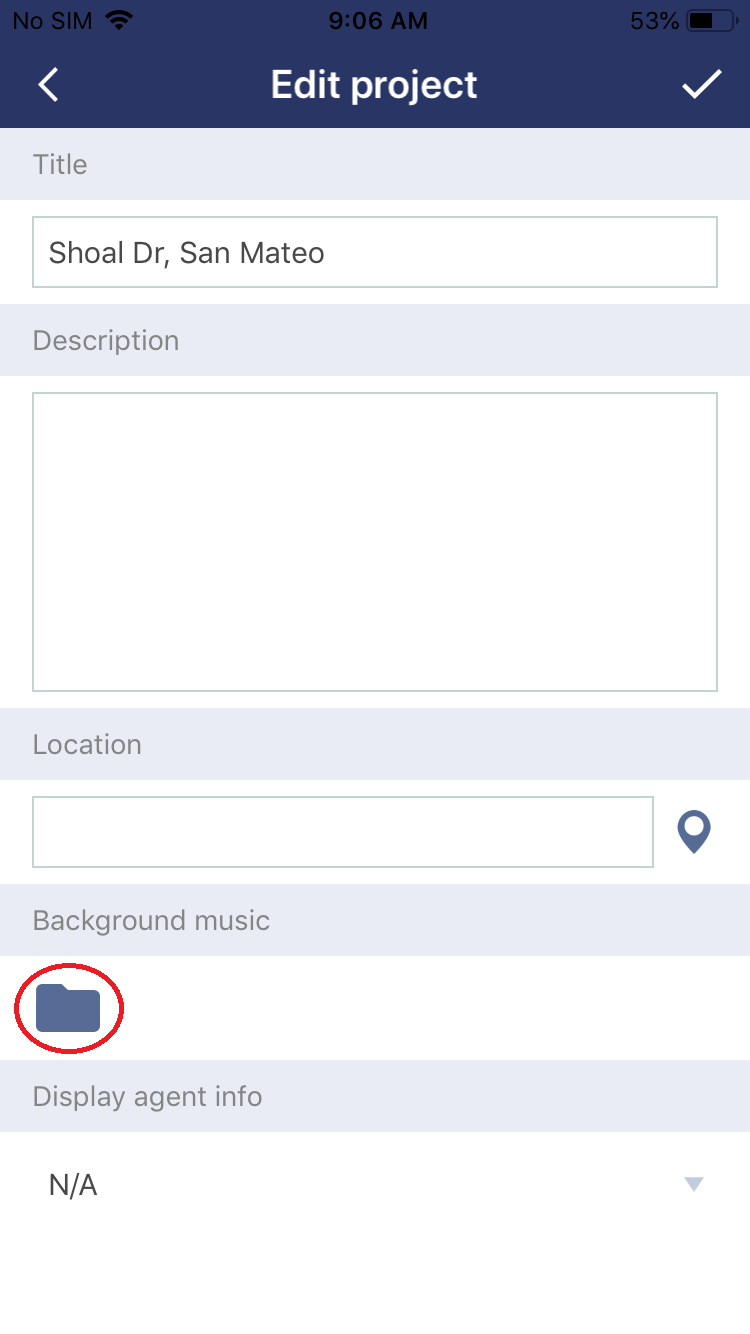
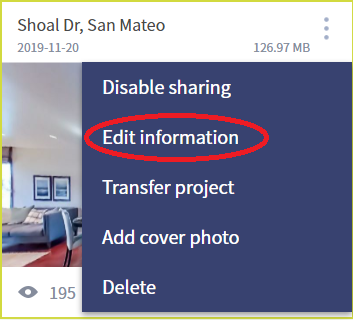
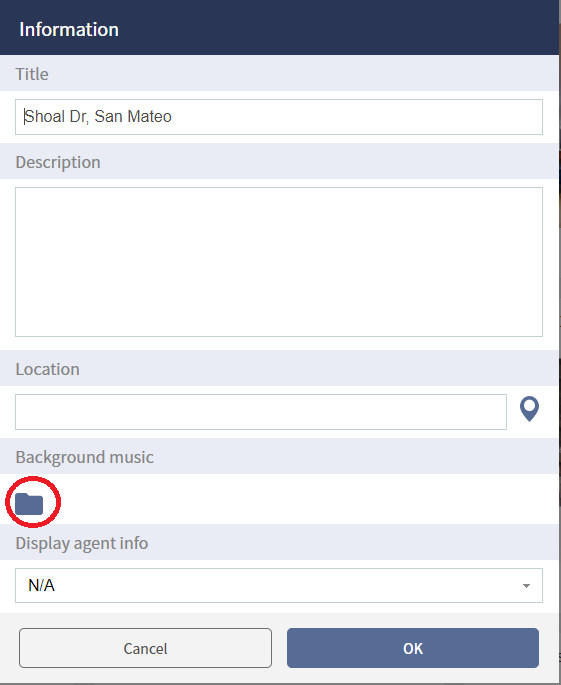
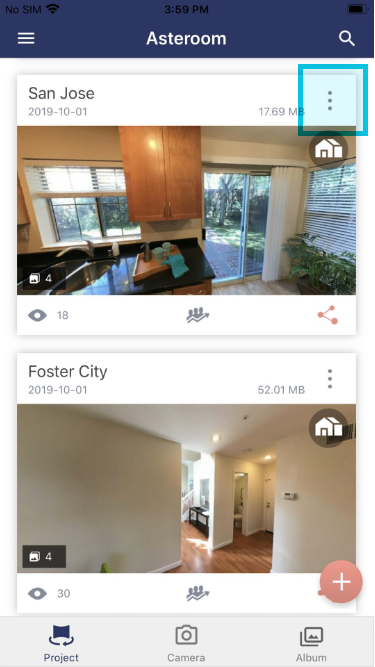
How can I upload background music?
- Log in Asteroom app or web editor.
- Select the tour you want to share.
- Click on More
 in the tour's top-right corner.
 - Click on " Edit information" > "Background music". Click on the folder icon to upload music.
- Click on Done in the top-right corner to save.
App interface

Web editor interface
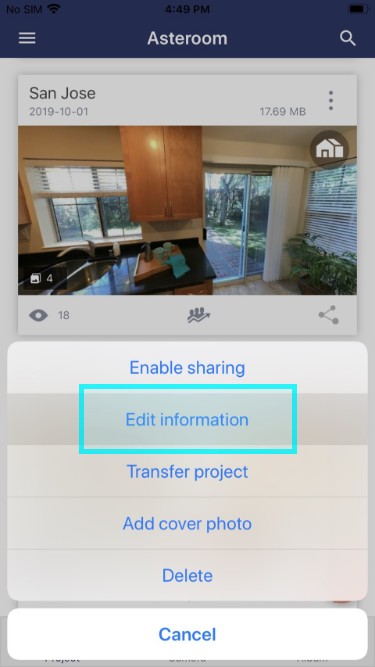
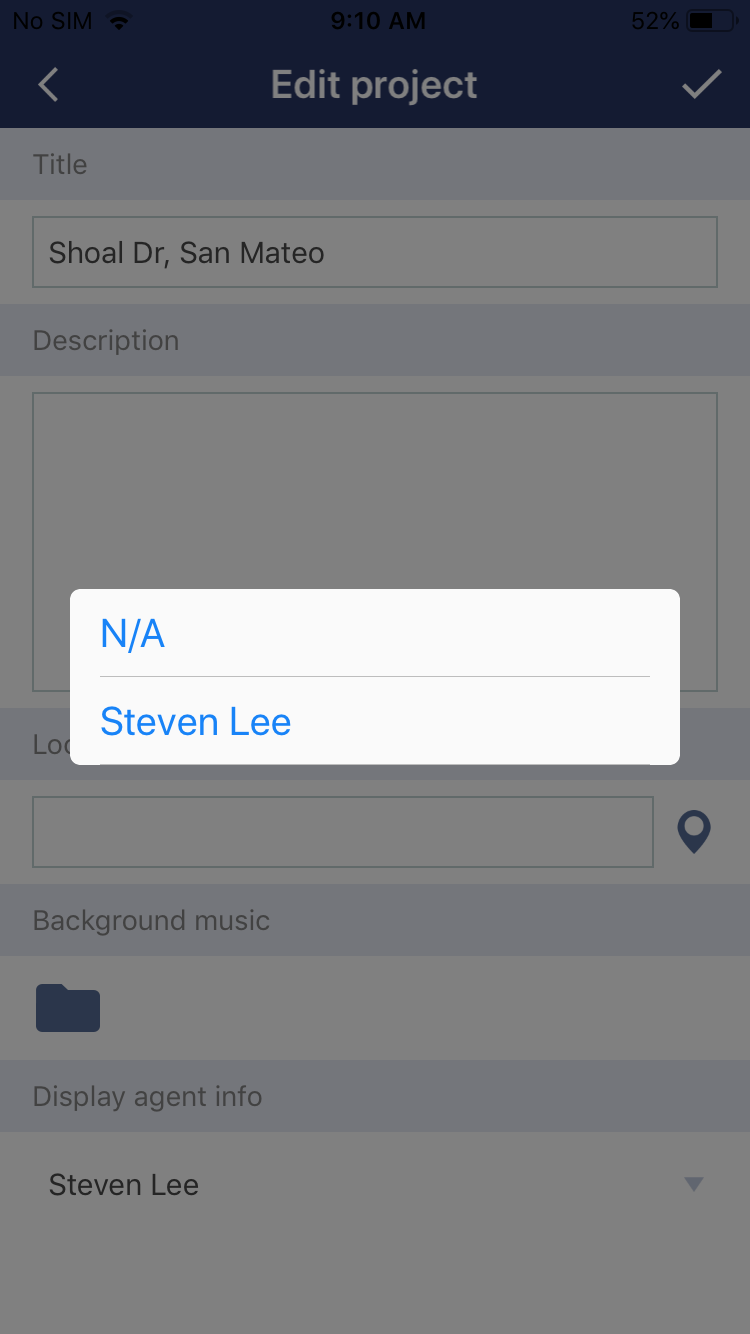
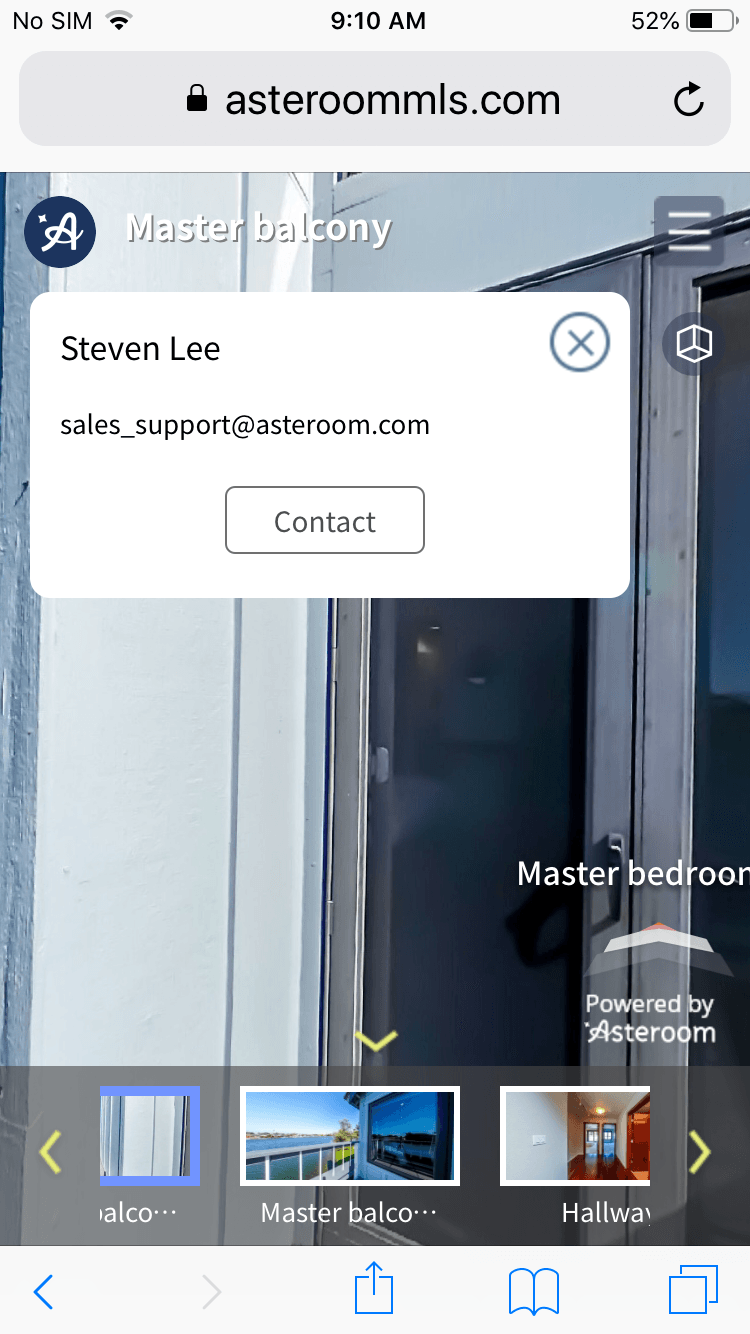
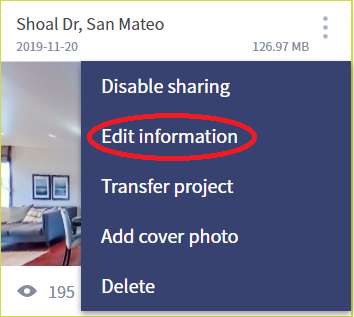
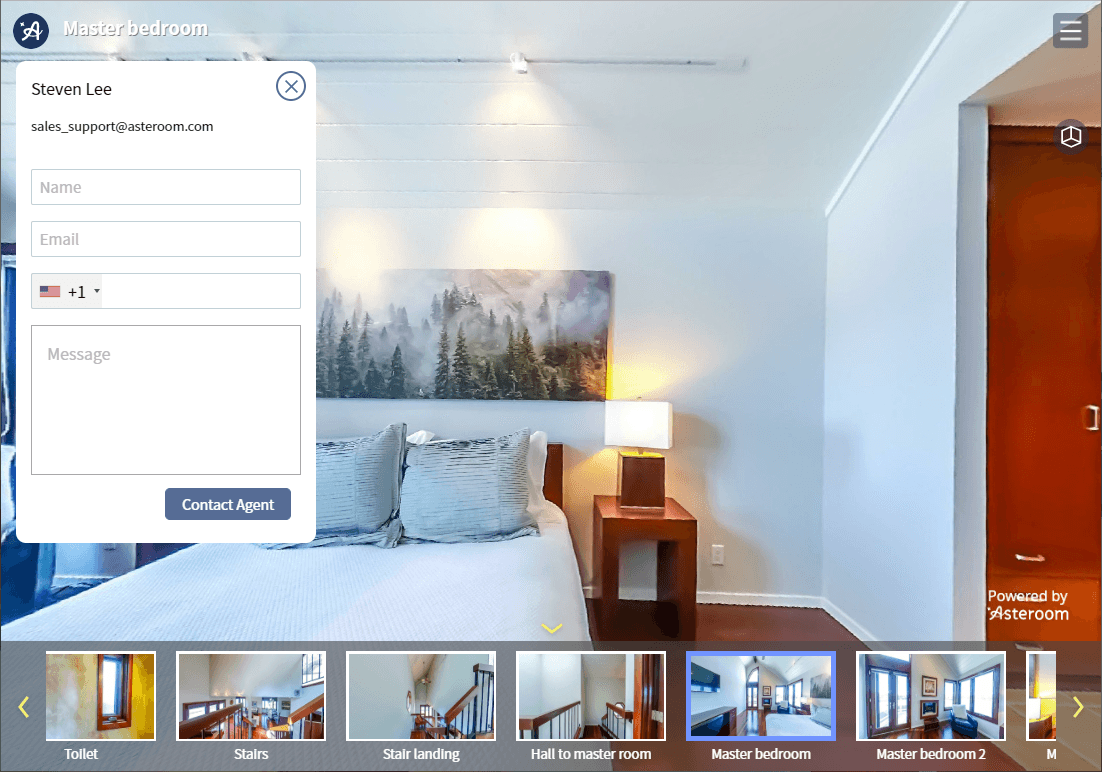
How can I display agent contact information?
- Log in Asteroom APP or web editor.
- Select the tour you want to share.
- Click on More on the tour's top-right corner.
- Click "Edit information" > "Display agent info". Select the agent responsible for the listing.
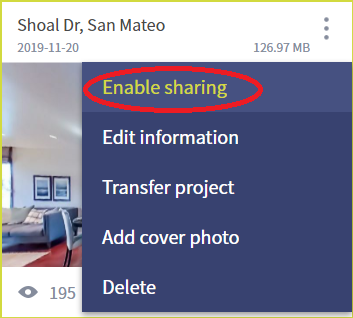
- And turn on "Enable sharing" in the More menu.
- Copy the share link to browser to ensure the contact information is correct.
App interface

Web editor interface

Update the panorama thumbnail on the mobile app and web editor
- Enter a tour and pick any panorama you’d like to change the view angle.
- Move the panorama to a view you like.
- Click
 to update thumbnail and its new view angle in panorama area will change immediatedly.
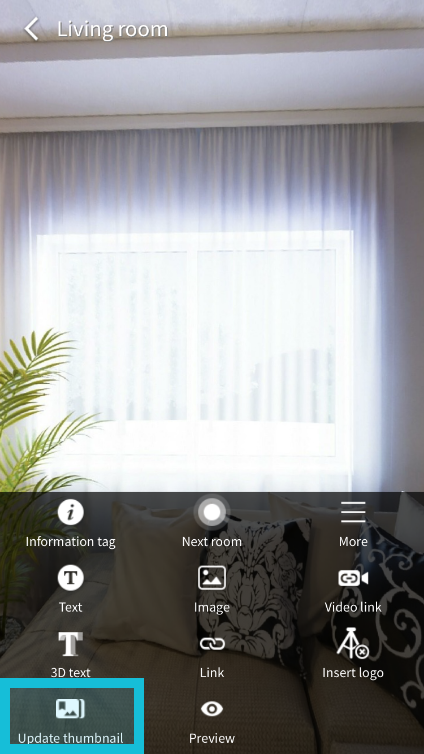
- You can also click
 in the bottom- left corner of panorama area to download all thumbnails from the web editor to use as listing photos.
- The panorama's thumbnail in tour mode will be updated right away.

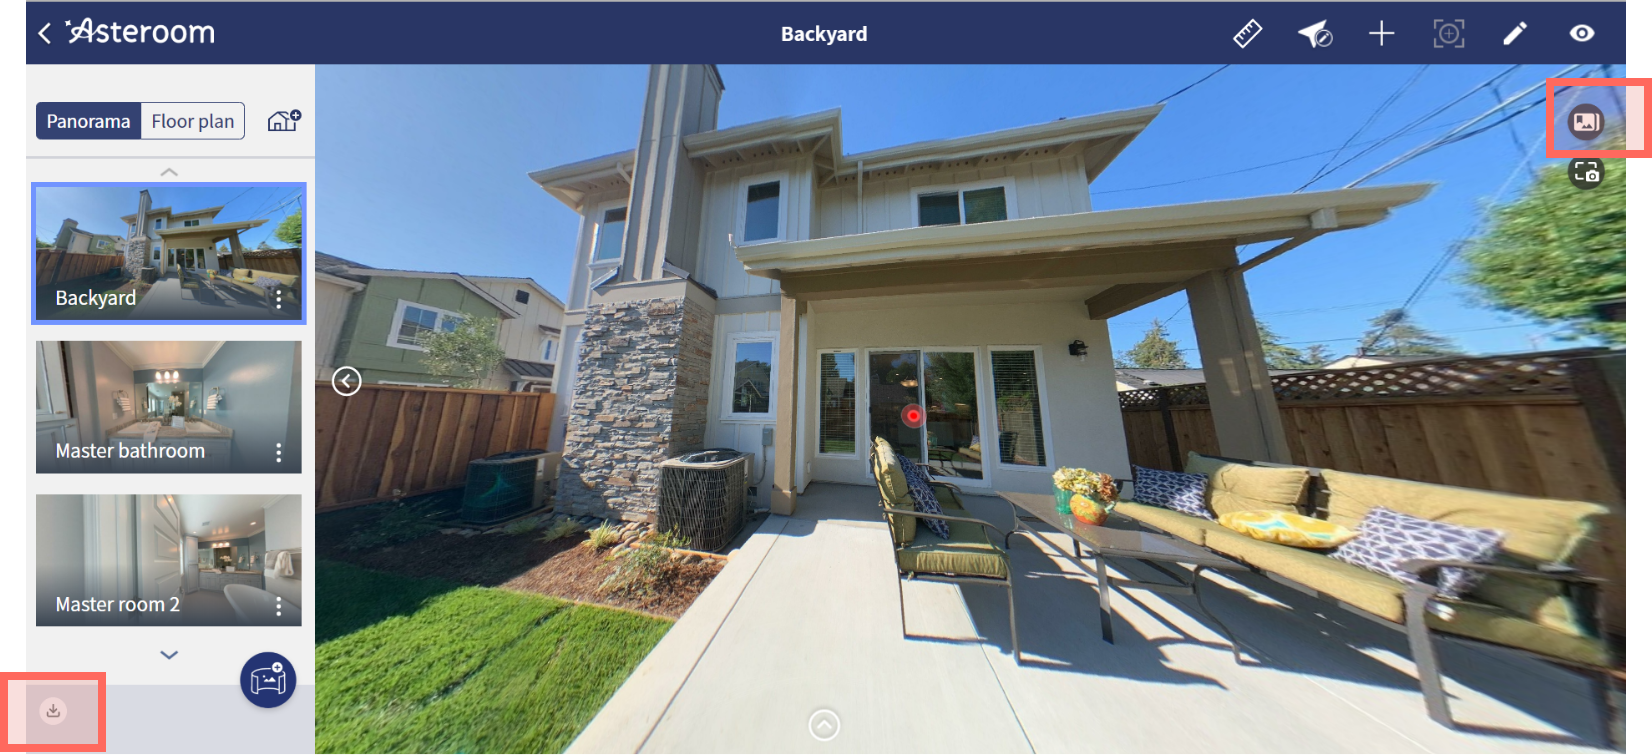
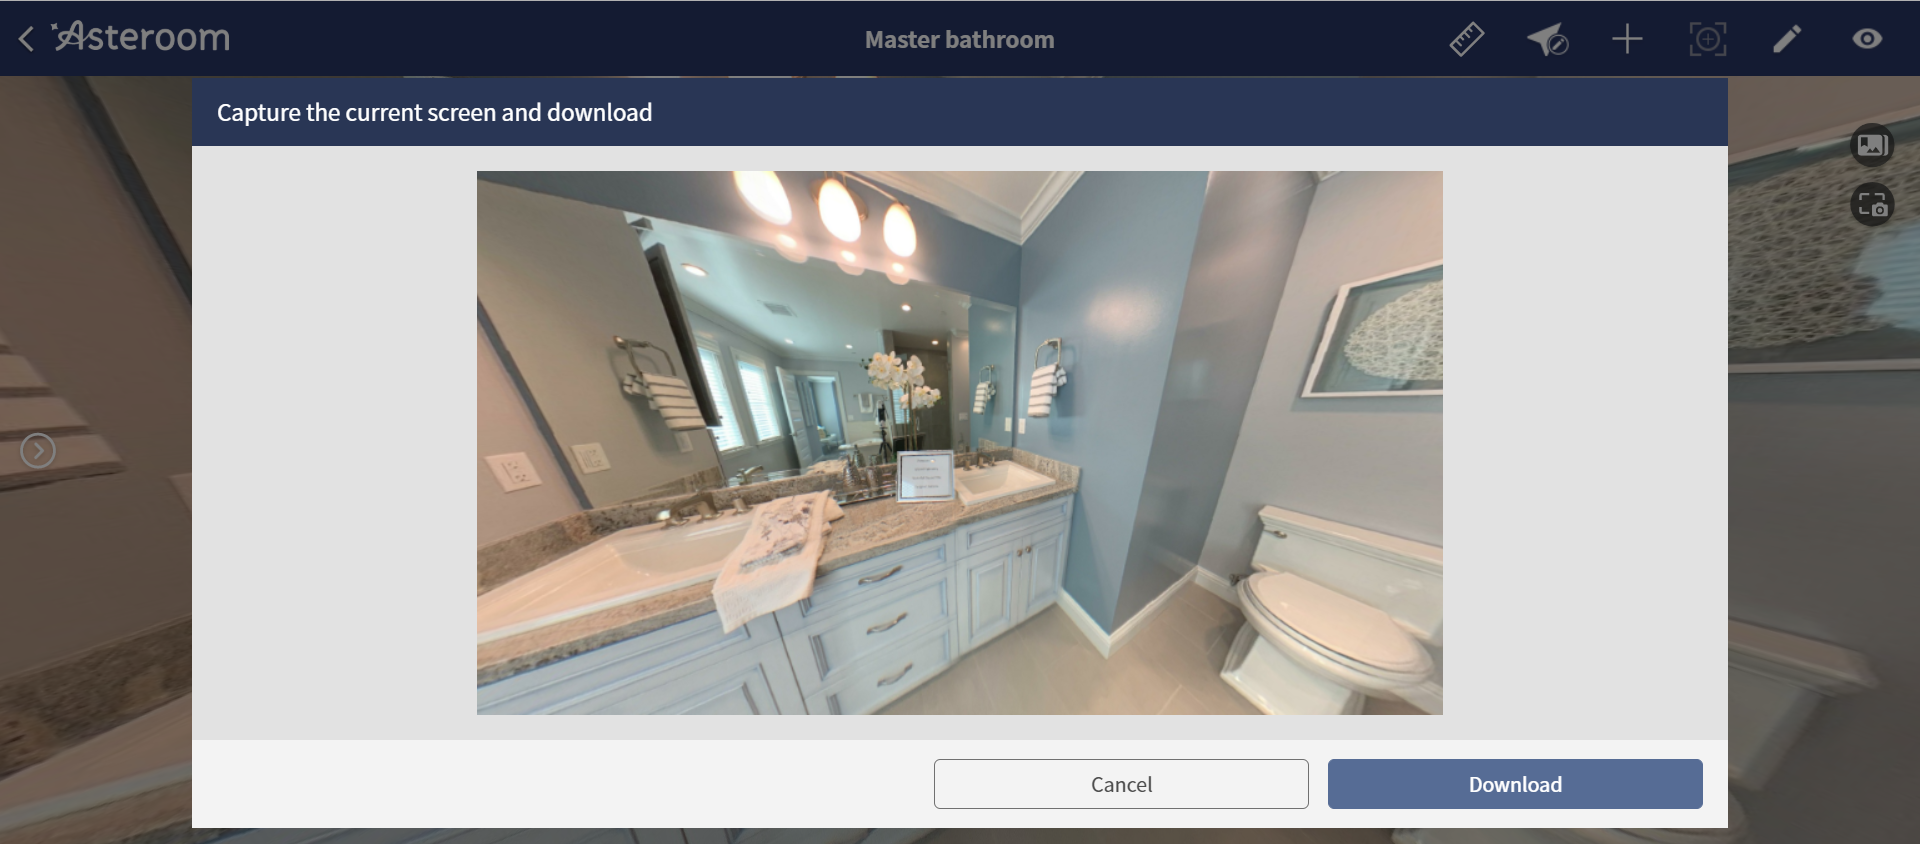
How can I take screenshots from a 3D virtual tour?
- Log in Asteroom Web Editor. This feature is only capable on web editor.
- Enter a tour and pick any panorama of which you’d like to take a screenshot.
- Adjust the panorama to a view angle which shows the best view of the room.
- Click the
 to capture the current screen and download the screenshot.
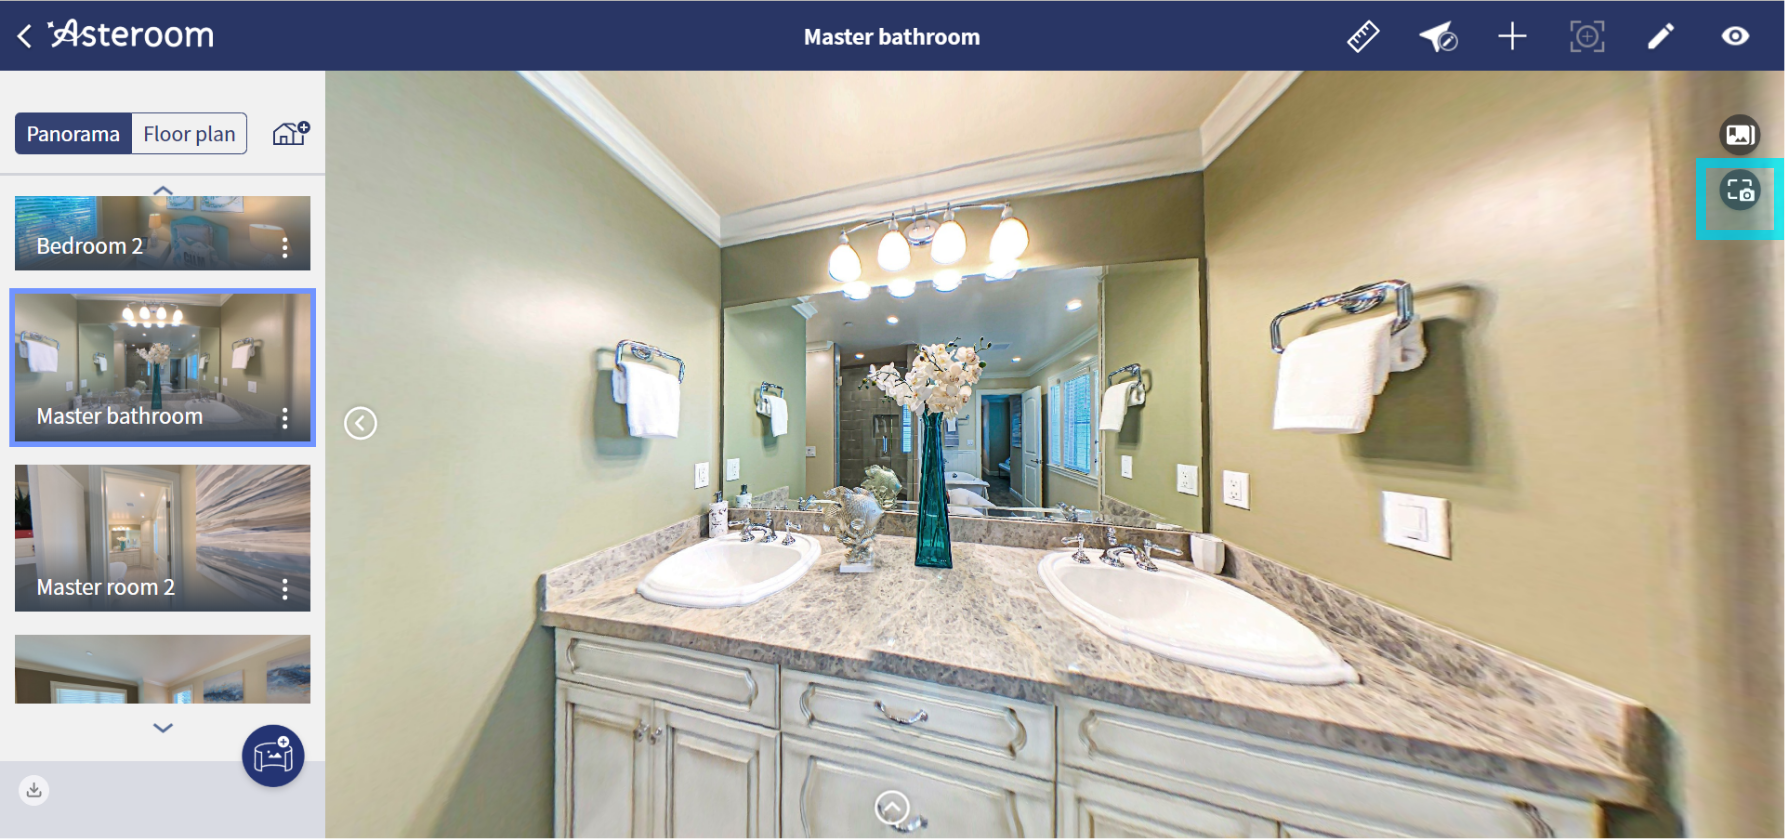
- Preview and download.
What is an active tour?
An active tour is a tour that can be viewed publicly via a share link. If your subscription is expired, the tour will be archived automatically and can not be viewed by others. The tour is still in your account and once renewing your subscription, you can use the tour again.
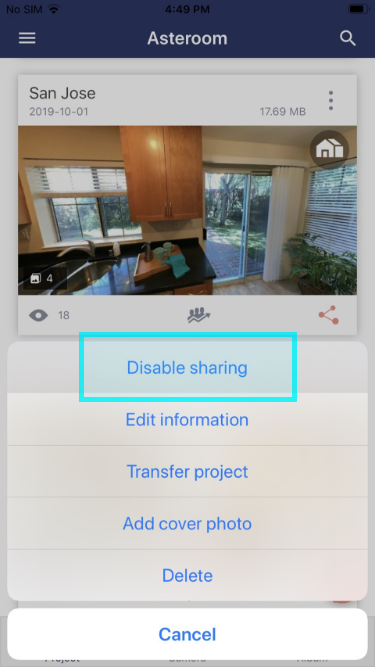
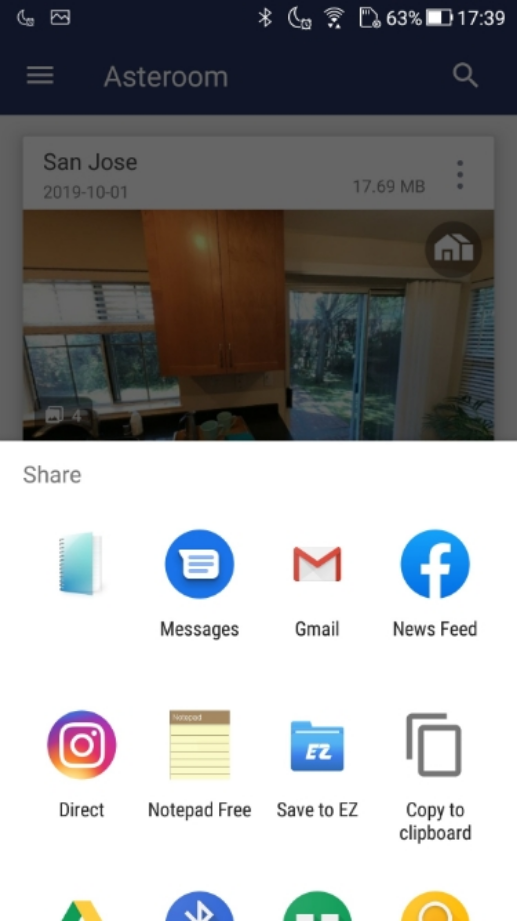
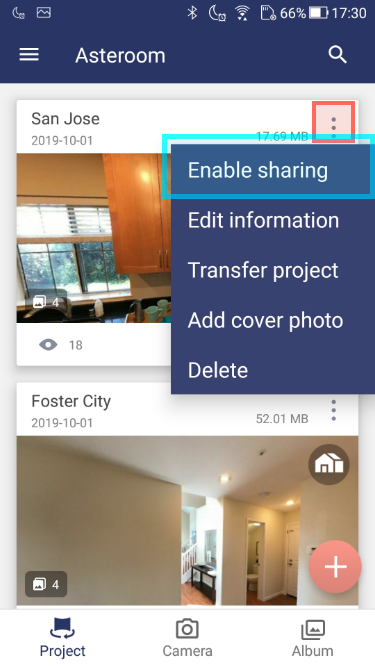
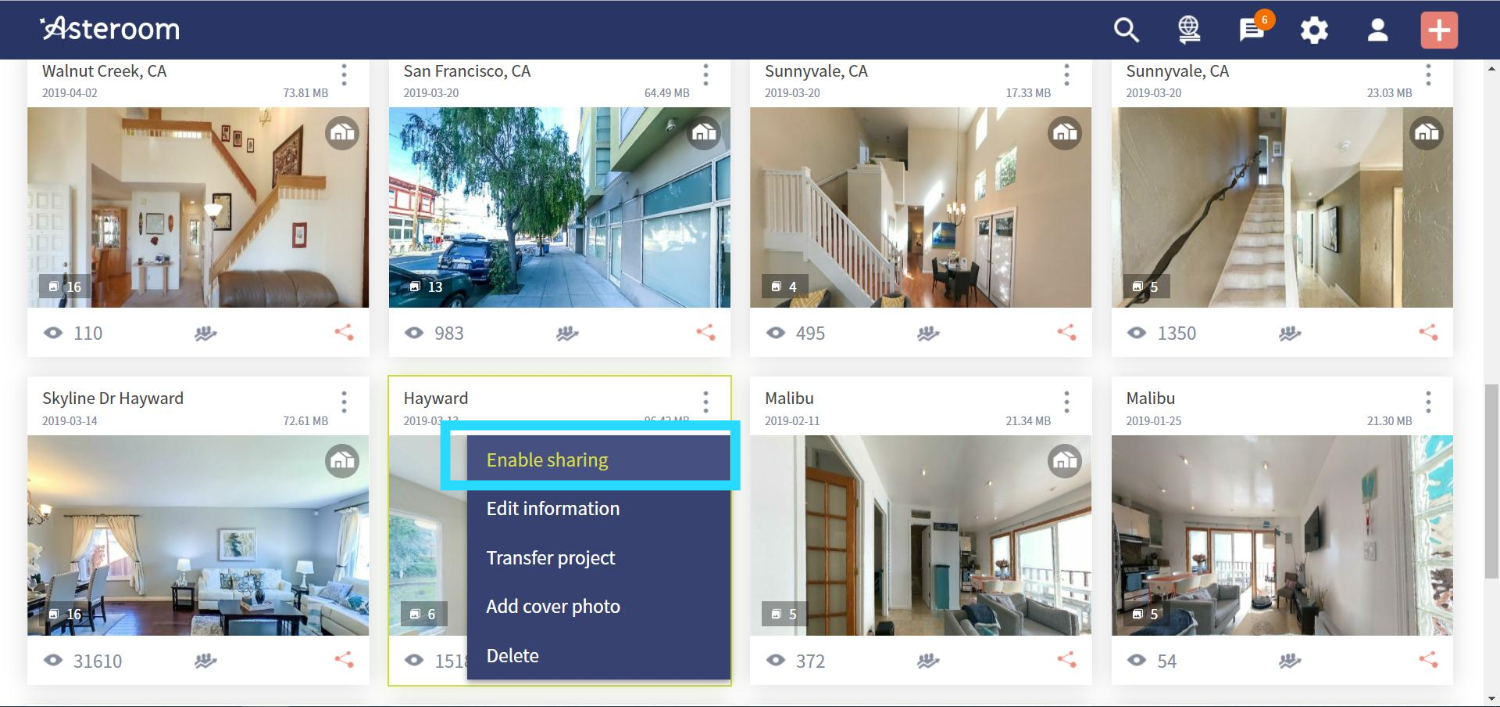
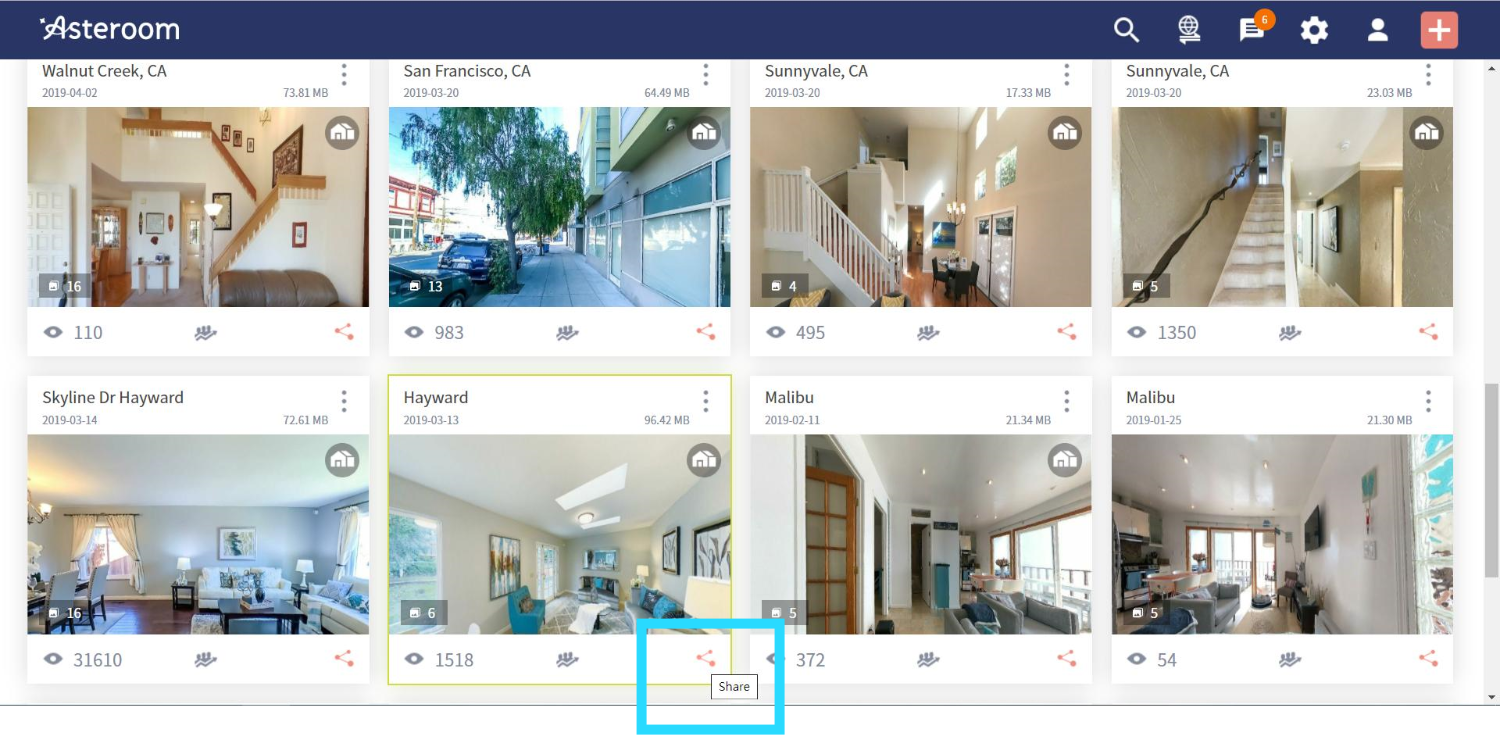
How can I share 360° virtual tour?
- Go to the tour main page and select menu in the top-right corner of tours. Next,select "Enable sharing".
- The tour's share
 will become pink, which means that it can now be shared.
 - If share is in pink, it means that sharing has already been enabled. If it is in grey, sharing is disabled and it is no longer possible to view the tour on your browser.
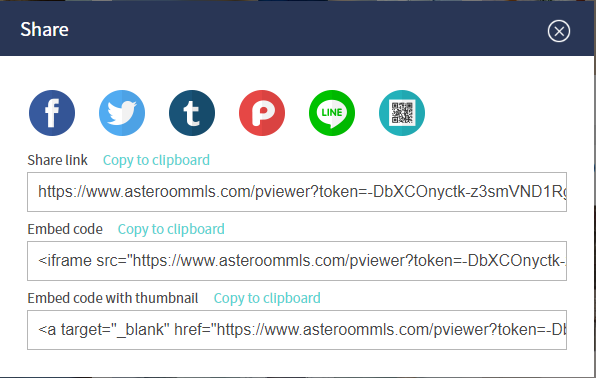
- Select “Copy to clipboard” and paste the link in the MLS, in email, or on social media, Or share it directly by selecting one of the social medium icon.

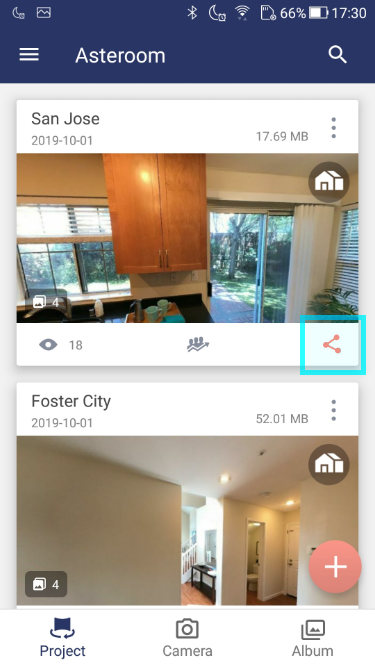
Get the share link from web editor
- Log in web editor and click "More feature" on the top right corner of a tour.
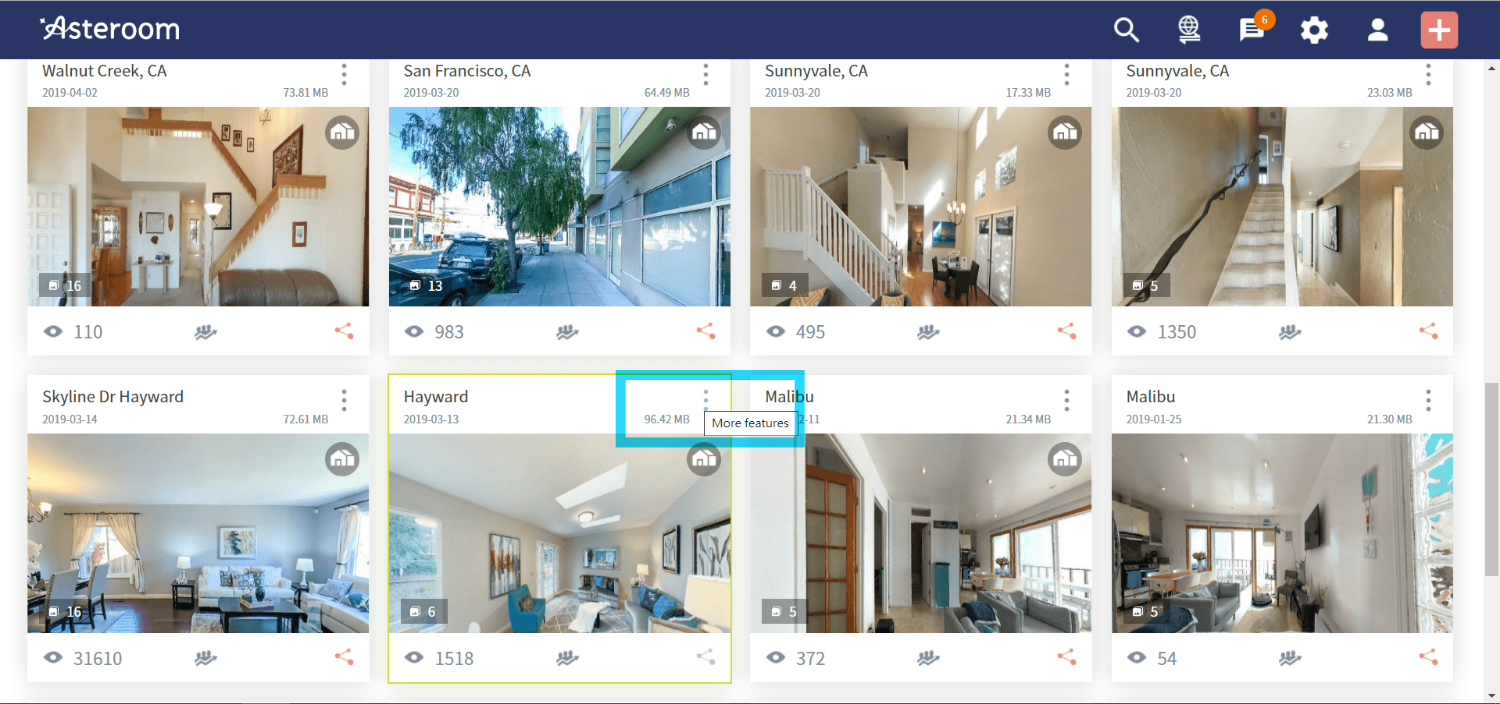
- Click "Enable sharing".
- Then click the share icon.
- Pick a social media of choice . Or select “Copy to clipboard” and paste the link on the MLS, in email, or on social media.

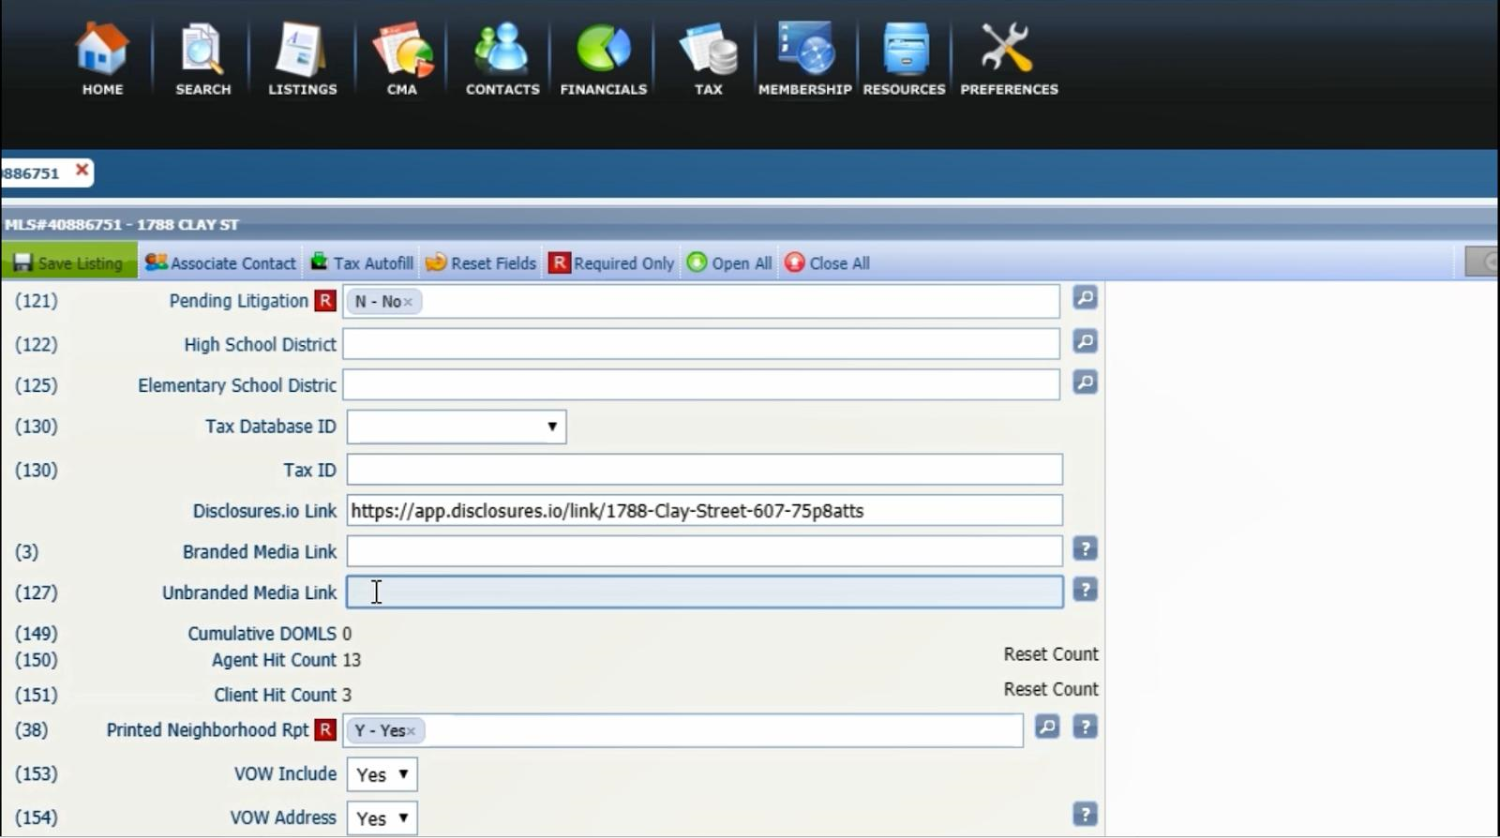
- Make sure you insert the link in your MLS as an unbranded media link.
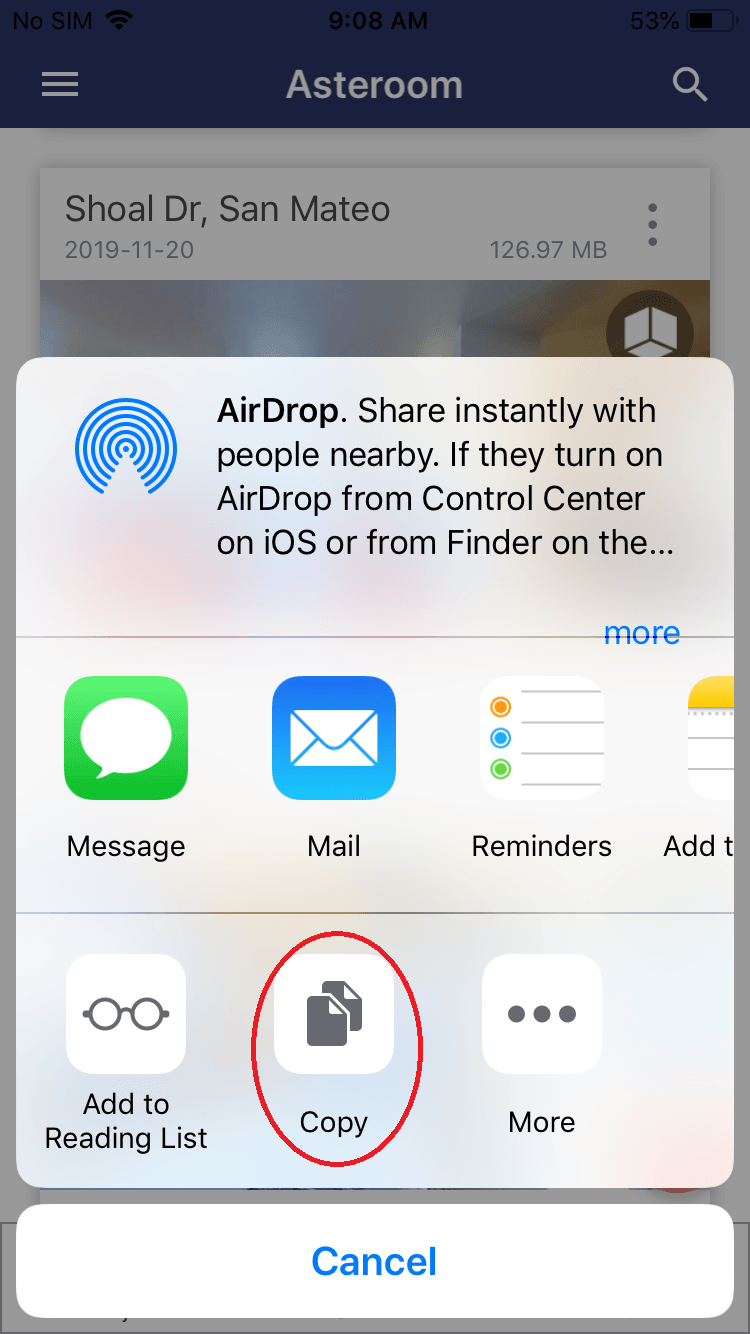
How to embed a virtual tour into your web page?
- In your web editor, select the tour and choose “share”.
-
Select Embed Code, and click “Copy to clipboard”.
<iframe src='https://www.asteroom.com/pviewer?token=2DZi4jJZ6kusmeN7YY6eWg&stopbgaudio=1&autorotation=0&autonav=0' width='800' height='450' frameborder='0' bgcolor='transparent' target='_blank' allowfullscreen webkitallowfullscreen mozallowfullscreen></iframe>
Helpful Tip: Autorotation 0 or 1 is used to set to auto-rotate on or off. The stopBGAudio function 1 or 0 is used to turn the preset background music on or off.
- Paste the copied code on your webpage. If you want to adjust the display frame size, you can change the values of the width and the height.
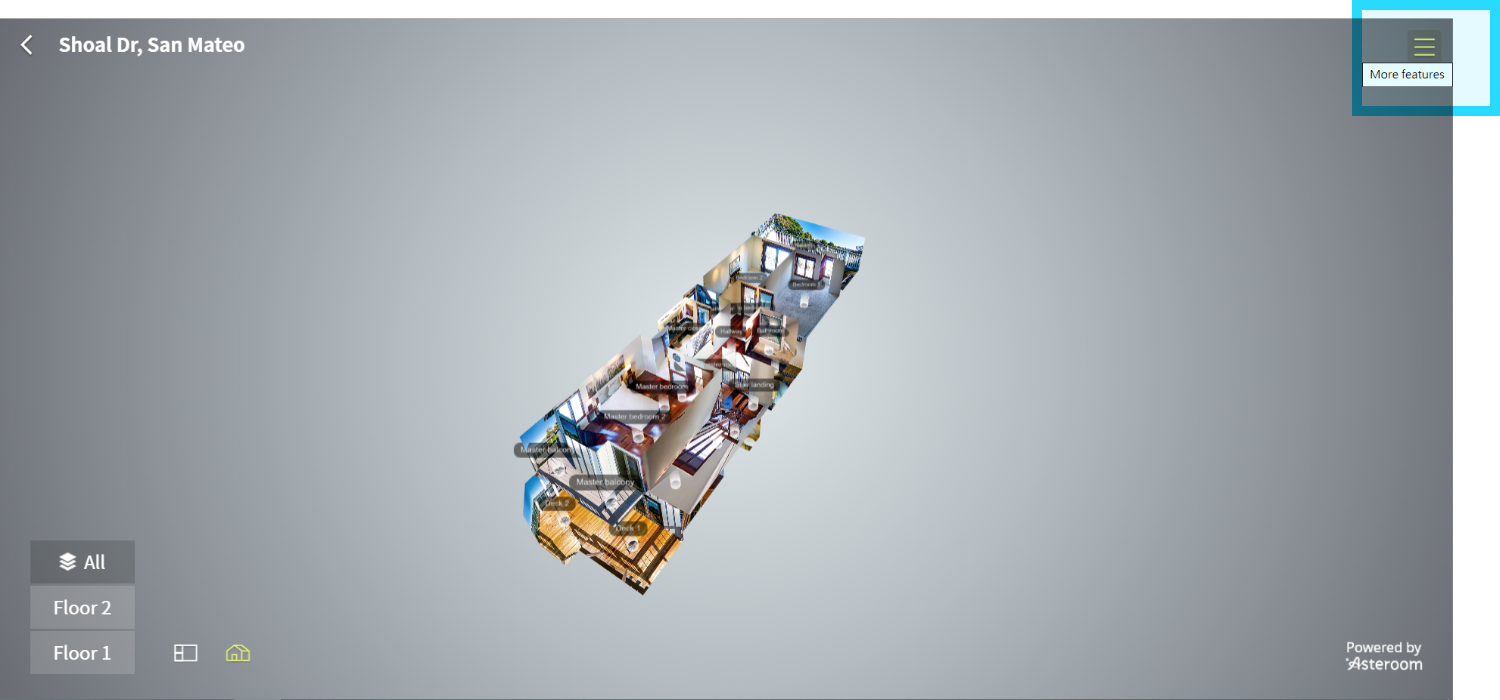
Download your walkthrough teaser video
- Log in Asteroom web editor. The teaser video is downloadable only on web browsers.
- Pick a tour with 3D Dollhouse and click “Preview” at the bottom-left of the tour or click
 to enter preview mode.
- Open “More features” on the top-right corner
- Click “Download teaser video”
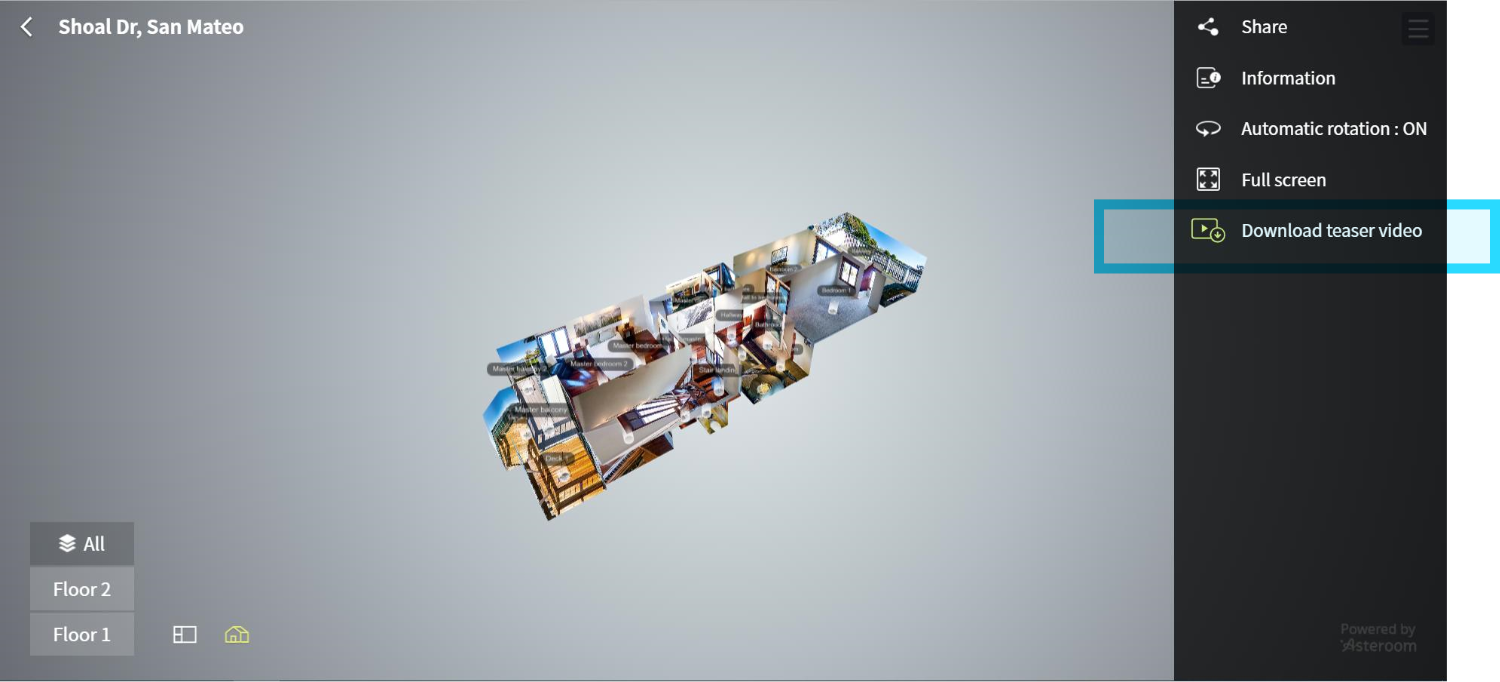
- Click “Download”.
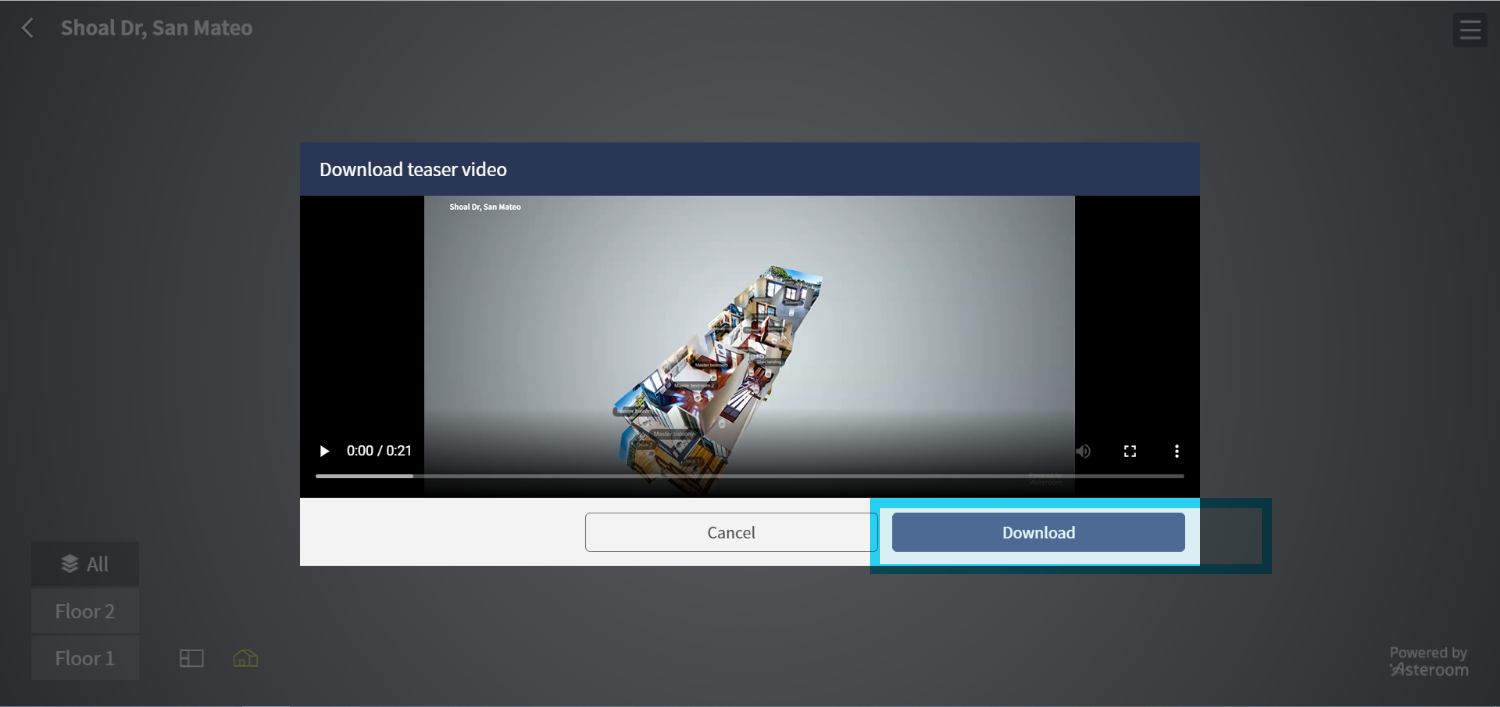
- Share the video on your social media, Youtube channel and MLS sites. Remember to include the link to the full home tour in your post! Check How can I share 360° virtual tour? to get the link.